Alcohol Ink Art Tutorial: A Calm Step-by-Step Guide
What if your first alcohol ink artwork doesn’t need perfectly controlled marks to feel complete? If you’re looking for an alcohol ink art tutorial for beginners, it’s natural to wonder which supplies to choose, how to guide the flowing colour, and whether you’ll end up with a finished-looking piece. You don’t need to master every movement before you begin. A little preparation and room to experiment can make the process feel more approachable.
This guide covers essential materials, how they work together, and a simple sequence for making your first artwork. You’ll also learn how to prepare a well-ventilated workspace and handle alcohol inks with care, including keeping them away from heat and open flames.
We’ll take the process one step at a time, from placing ink on a non-porous surface to gently encouraging it to move. Think of each mark as part of the exploration, not a mistake to erase. You can adapt the steps as you discover what you enjoy, or explore the medium with instruction at an Alcohol Ink Workshop in Dubai.
Alcohol Ink Art Tutorial for Beginners: Table of Contents
What Is Alcohol Ink Art, and What Can Beginners Expect?
Alcohol ink art is a fluid painting process that uses alcohol-based inks on suitable non-porous surfaces, such as Yupo paper, to create flowing shapes, layered colour, and organic edges.
Unlike a brush-led painting where each mark can be planned in advance, alcohol ink keeps moving as it spreads and blends. You can influence its path, but you can’t predict every detail. That’s part of the medium’s character: make a choice, observe what follows, then decide whether to leave it or guide it further. For a little background on what ink is, including its different types, see Wikipedia’s overview.
A small first study gives you room to learn without expecting yourself to create a polished composition straight away. Try a few drops and notice how the colour travels before planning a larger piece. These early marks are useful observations, not a test of artistic ability.
How Alcohol Ink Moves Across a Surface
On a non-porous surface, ink can spread outward, meet another colour, or overlap to form a distinct edge. A slight tilt may encourage it to travel in a new direction, and gentle airflow may also shift its movement. Neither guarantees a particular shape, so make one small change at a time and watch what happens.
Water-based paint is generally made to work with water and absorbent surfaces. Alcohol inks are used on surfaces that don’t readily absorb them, so the colour remains mobile as you work. This helps explain why the surface, the amount of ink, and how you move it all matter.
Is Alcohol Ink Art Suitable for a First-Time Artist?
Yes. You don’t need drawing skills or previous painting experience to try alcohol ink. An alcohol ink art tutorial for beginners can offer a helpful sequence, but your first goal can simply be noticing how the ink responds. A mark that spreads farther than expected is information for your next attempt, not proof that you lack ability.
Keep the first piece small and pause after each layer. Look at where the colour has gathered, where it has left open space, and whether you want to add anything else. That pause can help you make a considered choice instead of adding more automatically. The aim is not to control every mark, but to become more familiar with the medium one decision at a time.
Which Alcohol Ink Art Supplies Do Beginners Need?
You can begin with a small, purposeful kit. An alcohol ink art tutorial for beginners doesn’t require every applicator or colour at once. Start with materials that let you place a little ink, observe how it behaves, and work in a protected space.
Core: a few alcohol ink colours, a compatible non-porous surface, and small droppers or applicators for placing ink.
Core: a stable work area protected from spills, plus any protective equipment specified on the product labels.
Optional: a compatible blending solution or other recommended medium, and spare test pieces for trying small adjustments.
Choosing a Surface and Simple Application Tools
Synthetic paper, such as Yupo, is one possible surface, but compatibility can vary by ink and surface product. Check the manufacturers’ guidance before you begin. A small test on an offcut can show whether the ink spreads as you expect.
Ordinary absorbent paper may take in liquid rather than allowing the same kind of movement, so it can behave differently. Droppers and small applicators help you place ink in measured amounts, making it easier to see how each addition changes the marks. You can add more later; starting with less gives you room to observe.
Preparing a Workspace for Alcohol-Based Materials
Set up on a stable surface with a protective covering, and keep food and drinks away from your art area. Follow the ink and solvent labels for ventilation, protective equipment, use, and storage. Handling advice can differ between formulations, so check the instructions for the specific products you use.
Alcohol inks are flammable, so keep them away from heat and open flames. Check the product’s safety data sheet for its specific hazards and precautions, including whether it calls for gloves or eye protection. If you’re using a blending product or solvent, check its label and safety data sheet too. A calm workspace begins with knowing how to handle the materials you’ve chosen.
Gather only what you need for your first small study, then add optional tools if you find a clear reason to use them. If you’d prefer to explore the medium with instruction, you can learn about the Alcohol Ink Workshop in Dubai.
How Do You Control Alcohol Ink Flow Without Overworking It?
Alcohol ink is easier to work with when you guide it in small steps rather than trying to command every mark. The amount of ink, the angle of the surface, and airflow can all influence movement, but results depend on the ink, surface, and other materials you’re using. In this alcohol ink art tutorial for beginners, treat each adjustment as a small experiment: change one thing, then take a moment to see what happens.
Three Beginner-Friendly Ways to Move Alcohol Ink
Try these techniques separately on a practice surface first. That makes it easier to notice how each one affects the flow.
Adding blending solution or another solvent can also change how ink moves. The effect depends on the products involved, so follow their labels and test small amounts before using them in your main piece. More liquid isn’t automatically better; it’s simply another variable to notice.
What to Do When the Ink Spreads Too Far
Pause before trying to correct it. Look at the whole surface and give the mark a moment to settle. Sometimes a shape that first feels unexpected can become part of the composition once you add context around it.
If you do want to redirect the movement, test a small adjustment on a separate practice surface first. Depending on your materials, a slight tilt or a cautious addition of compatible ink or blending medium may influence the flow, but neither guarantees a particular result. Keep changes measured and reassess after each one. The aim is not to undo every surprise, but to learn which adjustments help you work more intentionally without crowding the artwork.
How to Make Your First Alcohol Ink Artwork: A Step-by-Step Tutorial
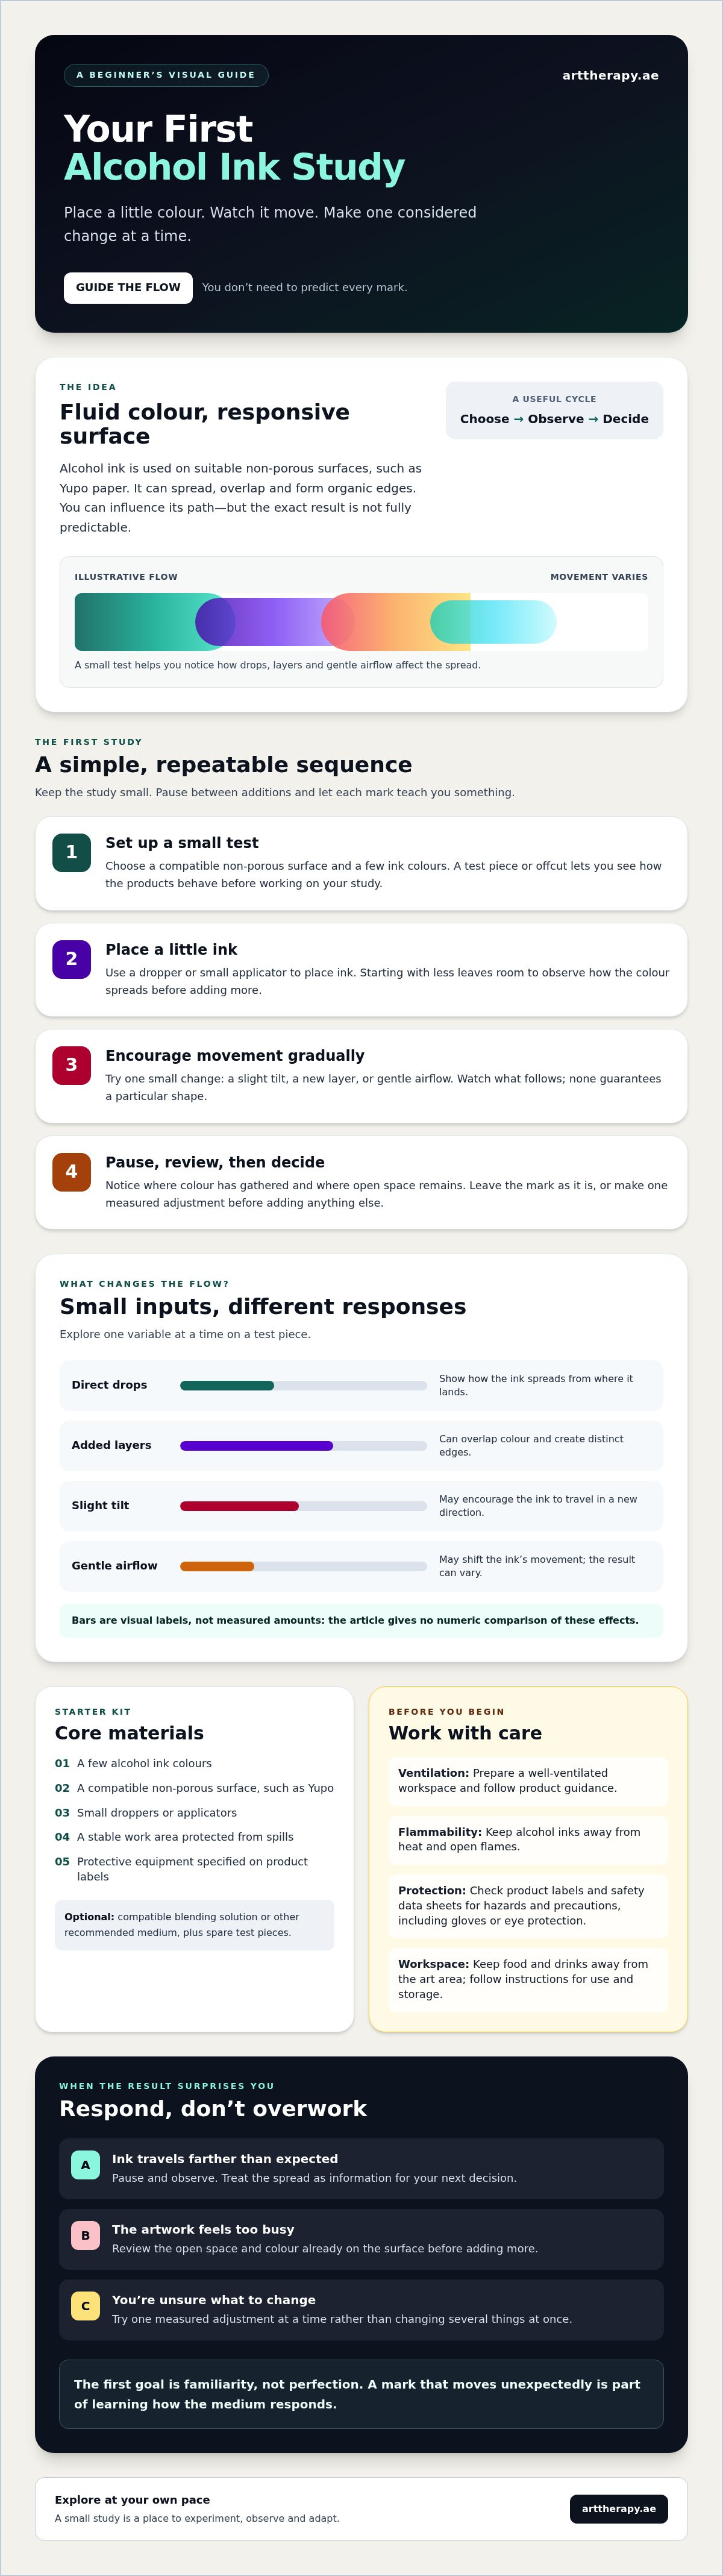
For your first piece, make a small abstract study rather than aiming for a specific image. No drawing skills are needed. This alcohol ink art tutorial for beginners gives you a repeatable sequence, with a pause at each stage so you can notice what the ink is doing before deciding what comes next.
In short, prepare your space, test the materials, place ink gradually, guide its movement gently, and pause to review before adding more.
Set Up and Place the First Layers
Prepare your workspace. Set out a compatible surface, inks, applicators, and a practice piece on a stable, protected work area. Follow each product’s label and safety data sheet for ventilation, protective equipment, handling, and storage. Keep alcohol inks away from heat and open flames. Pause: Is the work area ready, and do you understand the precautions for your materials?
Make test marks. Place one or two small marks on the practice surface. Notice how quickly the ink spreads and whether the surface allows it to move as expected. Pause: What happens when you use a small amount, and how does the result differ between your test marks?
Place your first colour. On the artwork surface, add a small drop of ink. Watch its movement before introducing another colour or medium. Pause: Is the mark still changing, or are you ready to build on it?
Guide the Composition and Know When to Pause
Gently influence the flow. If you want to move ink toward a particular area, try a slight surface tilt. Suitable gentle airflow is another option, but follow product-specific guidance and keep inks away from heat or flame. Pause: Did the adjustment support your intention, or is the ink already creating an interesting shape?
Add a layer only if it helps. Place a little more ink where you want colour or overlap, then give it time to respond. Each addition can change the balance of the piece, so avoid adding more simply because the surface feels unfinished. Pause: Does this layer add something you want, or would leaving the artwork as it is feel right?
Review and stop when ready. Look at the whole study from a little distance. You can leave open areas and unexpected edges as part of the composition. Your artwork doesn’t need to look perfect; it can be complete when you feel there’s nothing more you want to add.
If you’d like to explore the process with instruction, explore the Alcohol Ink Workshop in Dubai.
How to Troubleshoot Your First Alcohol Ink Artwork and Keep Exploring
An unexpected result is part of learning a fluid medium. Rather than trying to rescue every mark, treat each challenge as a clue about how your materials are behaving. A few measured changes can make your next practice session more informed, without promising that the ink will move in a particular way.
Common Beginner Challenges and Gentle Adjustments
The colours look muddy. Several overlapping additions may blend into a less distinct area. On your next practice piece, try fewer layers and pause to assess the surface before adding more. You might also test a simpler colour combination to see how those particular inks interact.
The ink spreads faster than expected. Try a smaller amount on a practice surface, then check that the surface is compatible with your ink. Different materials can behave differently, so consult the manufacturers’ guidance rather than assuming the same technique will work on every surface.
You’re unsure why a result changed. Keep brief notes after each session. Record the ink and surface you used, whether you added a blending product, and what happened after each adjustment. These observations can help you make more deliberate choices next time.
Keep the notes simple. For example: “Small drop spread quickly on this surface” is enough to remind you what to test next. Change one factor at a time when you can. That makes it easier to understand what influenced the result, whether or not you decide to use that effect again.
When a Guided Alcohol Ink Workshop May Help
Independent practice gives you space to explore at your own pace. A guided setting may help if you’d like to watch techniques demonstrated, ask questions as you work, or get support interpreting how the ink responds. It’s also fine to continue experimenting on your own; there’s no single right point at which to seek instruction.
Art Therapy offers an Alcohol Ink Workshop at its studio on Sheikh Zayed Road in Dubai. Workshop details can change, so check current information before making plans. It’s a creative learning opportunity, not clinical psychological art therapy.
If you’d like to explore the medium with instruction, you’re welcome to learn more about the Alcohol Ink Workshop in Dubai. Whether you work independently or with guidance, let each session build your familiarity with the materials, one observation at a time.
Let Your First Alcohol Ink Study Be a Beginning
Your first piece doesn’t need to match a picture in your mind. The most useful lesson from an alcohol ink art tutorial for beginners is to start small, observe how the ink responds on a compatible surface, and make one gentle adjustment at a time. A pause between layers can help you decide whether the artwork needs anything more, while product guidance and a prepared workspace help you approach the materials thoughtfully.
If you’d like to learn with instruction, Art Therapy offers an Alcohol Ink Workshop in Dubai at its studio on Sheikh Zayed Road. Beginners and experienced artists are welcome to explore the medium. Check the current workshop details, then explore the Alcohol Ink Workshop in Dubai.
Whether you experiment independently or join a guided session, let curiosity lead. Each mark is a chance to learn, and your next small study can begin whenever you’re ready.
Frequently Asked Questions
What supplies do you need for alcohol ink art as a beginner?
For an alcohol ink art tutorial for beginners, start with a few alcohol ink colours, a compatible non-porous surface, and a small dropper or applicator. You’ll also need a stable work surface with a protective covering. A blending solution is optional, but check that it’s suitable for your ink and follow its label. Keep your first setup simple, and consult product guidance for handling and protective equipment.
Can beginners do alcohol ink art without drawing experience?
Yes, you can experiment with alcohol ink without drawing or painting experience. The process involves placing ink and observing how it moves, rather than sketching a subject first. Begin with a small abstract study and treat early marks as practice. Pause after each addition to notice the colours and shapes forming. An unexpected result is useful information for your next choice, not a measure of your artistic ability.
How do you keep alcohol ink from spreading too much?
Use a small amount of ink first, then watch how it moves before adding more. The surface, ink, and any blending product can affect how quickly colour spreads, so test adjustments on a practice piece. A slight tilt may influence the direction of wet ink, but it won’t guarantee a specific result. If the colour travels further than expected, pause before trying to redirect it, and change only one thing at a time.
Is alcohol ink art safe to do at home?
Alcohol ink can be used at home with care, but don’t assume every product has the same precautions. Work in a well-ventilated area, keep inks away from heat and open flames, and follow the ink and solvent labels for protective equipment, handling, and storage. Check the safety data sheet for product-specific hazards. Keep food and drinks away from your workspace. If pregnant, avoid using alcohol inks because the effects of inhaling fumes are unknown.
What surface should a beginner use for alcohol ink art?
A non-porous surface made for use with your chosen ink is a practical starting point. Yupo paper is commonly used, while synthetic paper, ceramic tile, metal, or glass may also be options depending on product compatibility. Check the ink and surface manufacturers’ instructions before starting. Try a small test on an offcut or spare surface first. Absorbent paper may take in the ink and behave differently, so don’t assume it will produce the same flow.
Why do alcohol ink colors look muddy when they blend?
Colours can look muddy when several layers overlap or blend together, especially if you keep adding ink before assessing the earlier marks. The exact result depends on the colours and products you’re using. For your next practice study, try fewer colours, add ink in smaller amounts, and pause between layers. Use a clean applicator for each colour where practical, and note which combinations you prefer. A simpler arrangement can help each colour remain more distinct.
Can you learn alcohol ink art in a workshop in Dubai?
Yes. Art Therapy offers an Alcohol Ink Workshop in Dubai at its studio on Sheikh Zayed Road. The studio welcomes beginners as well as experienced artists, so a workshop can be an option if you’d like to explore the medium with instruction. Check current workshop details before making plans, as specific arrangements aren’t confirmed here. The workshop is a creative learning experience, not clinical psychological art therapy.


Comments