How to Use Texture Paste in Art with Baking Soda and Stencils
Updated: 49 minutes ago
Spread texture paste over a prepared surface with a palette knife, or press it through a stencil, then let it dry completely before painting. If you’re learning how to use texture paste in art, begin with thin layers and simple marks. For homemade baking soda paste, mix equal parts white school glue and baking soda until smooth.
Textured art adds raised shapes and patterns to a painting, creating depth you can see and feel. The result doesn’t need to be perfectly smooth: each tool leaves its own mark, and small experiments can help you develop a personal style.
This guide shows how to use texture paste in art, from choosing a surface and mixing baking soda paste to applying it with tools or stencils. You’ll also learn how to explore different textures, work with colour, and let each layer dry before moving on. Begin with a small test, notice how the material responds, and allow the making process to shape what comes next.
Table of Contents
How do you make texture paste with baking soda?
When learning how to use texture paste in art, start with thin layers on a prepared surface. Homemade paste can crack if applied too thickly, so build up raised areas gradually instead of spreading one heavy coat.
Paste may crack if its outer surface dries before the thicker centre, or if paint seals in moisture. Apply thin coats, let each layer dry completely, and wait at least 24 hours before painting the textured surface.
Wash acrylic modelling paste from tools and surfaces with water while it’s still wet. If you sand dried texture, wear a respirator to reduce exposure to airborne dust.
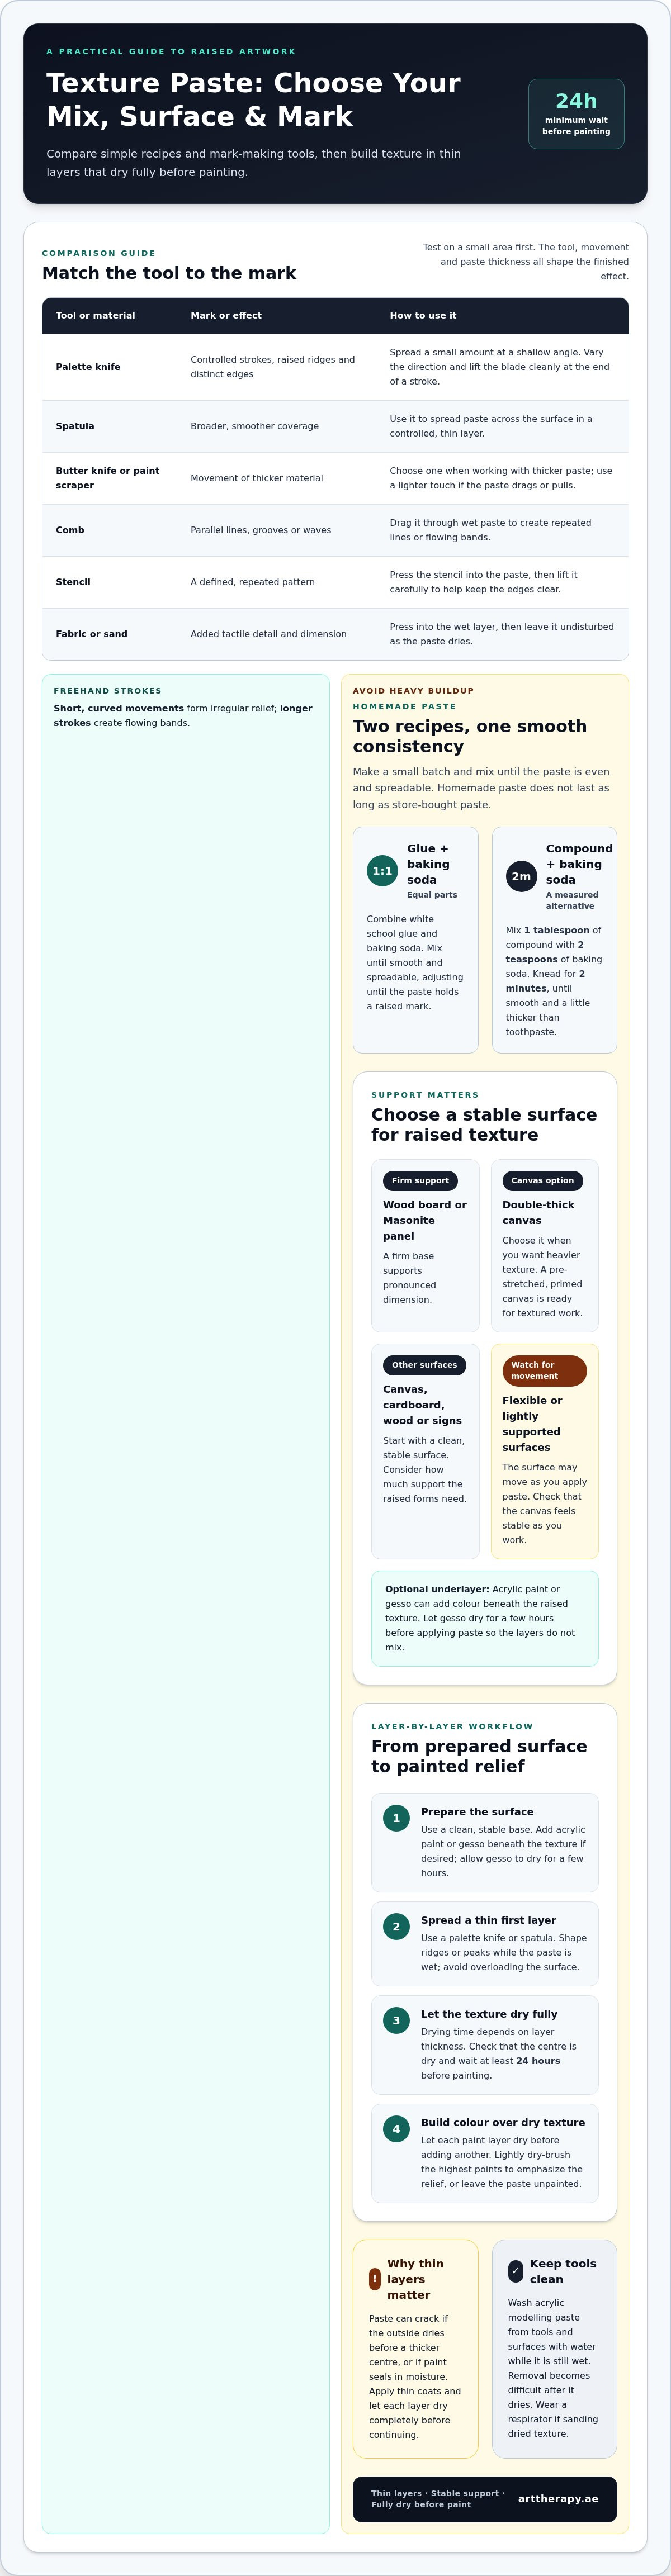
Choose a baking soda recipe and mix it smoothly. For a simple paste, combine equal parts white school glue and baking soda. Mix until the ingredients form an even, spreadable consistency. Another recipe uses 1 tablespoon of compound with 2 teaspoons of baking soda. Knead the ingredients together for 2 minutes, until the paste is smooth and a little thicker than toothpaste. Make a small batch, because homemade paste doesn’t last as long as store-bought paste.
Prepare the painting surface. Start with a clean, stable surface such as canvas, wood, cardboard, or a sign. Apply acrylic paint or gesso as a base if you want colour beneath the raised texture. Let gesso dry for a few hours before adding paste to keep the layers from mixing. A prepared base makes it easier to work consistently across the surface.
Apply the paste in controlled layers. Spread a thin coat with a palette knife or spatula, then shape ridges or peaks while the paste is wet. For a softer impasto effect, mix modelling paste with acrylic paint before applying it. Press fabric or sand into the wet layer to change its surface. As you learn how to use texture paste in art, avoid heavy buildup that could crack as it dries.
Let the texture dry fully before painting. Leave the surface to air-dry so the paste holds the shape you created. Drying time depends on the thickness of the layer, so check that the centre is dry before moving on. Wait at least 24 hours before painting over the applied texture. Painting too soon can trap moisture beneath the acrylic layer and contribute to later cracking.
Build colour over the dry texture. Brush on a base colour and let each layer dry before adding another. This helps prevent smudging and muddy colour where raised ridges meet recessed areas. To emphasize the relief, lightly dry-brush paint across the highest points. You can also leave the dried paste unpainted for a raw, industrial look, or paint over it with acrylic or oil paint.
Applying texture paste with a palette knife or spatula
Texture paste and modelling paste are names for a thick, gesso-like material that creates raised artwork; gesso is usually used to prepare a surface for painting. Use a palette knife or spatula to spread paste, shape ridges, or make freehand marks on canvas.
Choosing Tools for Applying Paste
Choose a tool for the mark you want and test it on a small area. A palette knife or spatula spreads paste smoothly, while a butter knife or paint scraper moves thicker material. A comb creates parallel lines or waves, and pressing fabric or sand into wet paste adds another tactile layer.
Set out one spreading tool. Use a palette knife for controlled strokes, or a spatula for broader coverage. Keep a comb nearby if you want repeated grooves.
Check the surface and paste. A canvas should feel stable as you work. If the paste drags or pulls, use a lighter touch rather than pressing harder.
Keep tools clean as you go. Acrylic modelling paste washes from tools and surfaces with water while wet. Once it dries, removal becomes difficult.
Applying Paste with a Palette Knife
Load a small amount onto a palette knife and draw its edge across the surface to form a ridge. Vary the angle and direction for different marks. Work freehand for organic shapes, or drag a comb through wet paste to make waves. Avoid piling homemade paste into a thick mound, as it can crack while drying.
Spread a controlled first pass. Hold the knife at a shallow angle and move steadily. Let the blade’s edge leave a raised line, rather than pressing the paste flat.
Vary the movement. Short, curved strokes form irregular relief; longer strokes create flowing bands. Press fabric or sand into wet paste for added dimension, then leave it undisturbed.
Lift the knife cleanly. Pull the tool away at the end of each stroke to leave a distinct edge. Rinse it with water before paste dries, especially around the blade and handle.
For guided practice with these mark-making techniques, a Palette Knife Painting Workshop offers a focused setting to explore how tool pressure and movement shape a painted surface.
Choosing paste textures for art projects
Texture paste, also called modelling paste, is a thick, gesso-like material that creates raised areas in artwork. You can apply homemade paste to canvas, wood, thrifted decor, cardboard, or signs. Choose a firm base when you want pronounced dimension.
Match the surface to the weight of your design. A wooden painting board or Masonite panel gives modelling paste firm support. If you prefer canvas, choose a double-thick canvas for heavier texture. A pre-stretched, primed canvas is ready for textured work, while a flexible or lightly supported surface may move as you apply paste. Consider the finished artwork’s size and the support needed for its raised forms.
Choose a texture that supports the image. Smooth, low ridges can provide a quiet background for a painted subject. Deeper grooves or clustered peaks add dimension to an abstract composition. A few sweeping marks can suggest movement, while repeated lines create a more ordered effect. Let the image guide your texture instead of covering the whole surface with one pattern.
Balance raised areas with open space. Sketch where you want the strongest relief before applying paste. Leave some areas smooth so the eye can rest between textured marks. On a cardboard sign, for example, keep lettering clear and add paste around the edges. On a wood panel, place raised details near the focal area and use flatter sections for contrast.
Plan colour around the surface relief. A single acrylic colour can bring out light and shadow across ridges without competing with their shape. If you want several colours, decide which areas should stay calm and which should draw attention. A pale base with a darker colour on raised details can make the relief easier to see, while a restrained palette preserves the material’s tactile quality.
Test the combination before committing. On a small piece of cardboard or spare primed canvas, try a smooth area beside a raised one. Compare how your chosen colour looks on both. You can also combine texture paste with acrylic paint, sand, or fabric for varied effects. Testing first helps you judge how the surface, texture, and colour work together before you cover a larger board.
For a project focused on sculptural surfaces, a 3D Texture Art Workshop can help you explore how raised marks and open space work together. Bring a clear intention, then let the material’s changing surface guide your choices.
Using stencils with texture paste
Press a stencil into wet texture paste to create a raised shape or repeating pattern. For a clear result, position it steadily, apply the paste evenly, and lift the stencil carefully.
Choose a stencil that suits the composition. Pick a bold motif, such as leaves, circles, or geometric lines, when you want the raised pattern to read clearly. Fine details can fill with paste, so choose a simpler design when using a thick mixture. Consider how the stencil’s open spaces will sit beside smooth areas. Test the pattern on scrap cardboard before applying it to your main surface.
Position and steady the stencil. Place it on a clean, prepared canvas, board, or sign, then hold it flat to prevent paste slipping beneath the edges. Low-tack tape can help stop it shifting; apply the tape gently and avoid pulling at a fragile surface. For a repeating pattern, mark where the first motif ends so the next one aligns. Check the stencil’s edges before spreading paste.
Spread paste across the openings. Place a small amount of paste over the stencil with a palette knife or spatula. Draw the tool across the surface evenly, pressing paste into the openings without forcing it underneath. A light, controlled pass helps keep the design’s edges clear. For a leaf stencil, for example, fill each cutout without covering the veins and surrounding spaces with a thick mound.
Lift the stencil with care. Hold the artwork steady and raise the stencil slowly from one edge, rather than dragging it across the wet paste. This reveals the pattern without smearing nearby marks. If an edge looks uneven, avoid reshaping it while the stencil is still in place. Clean the stencil while the paste is wet so dried material won’t block its openings next time.
Let the pattern dry before adding another layer. Leave the design undisturbed until the paste is completely dry. Texture paste should dry for at least 24 hours before you paint the surface. Once dry, add acrylic colour over the motif, or leave the raised paste unpainted for a raw finish. If repeating a stencil design, let each section dry before placing the stencil nearby, which helps protect earlier edges.
Experiment with placement and contrast. Try a stencil motif near a corner, then compare it with a repeated band across the centre. Combine a defined stencil shape with freehand marks, leaving some areas open. A dark acrylic wash can emphasize the raised edges, while dry-brushed colour catches their upper surfaces. These techniques draw attention to the pattern without crowding the composition.
Homemade texture paste ingredients
Start with the simplest baking soda mixture. Combine equal parts white school glue and baking soda, then stir until evenly blended. This versatile option suits small raised details and stencil patterns. For another baking-soda variation, mix 1 tablespoon of compound with 2 teaspoons of baking soda. Knead that mixture for 2 minutes until smooth and slightly thicker than toothpaste.
Compare glue-based alternatives. For a baby-powder paste, combine 1 part school glue with 1 part baby powder. A simple plaster paste uses 1 part Plaster of Paris with 1 part PVA glue or Elmer’s Glue. These mixtures let you explore different ingredients while keeping the proportions easy to remember.
Choose cornstarch for another basic recipe. Combine 1 part cornstarch with 1 part glue for a paste suitable for raised marks. A separate cornstarch-and-water method uses equal parts cornstarch and water in a saucepan. Cook the mixture over medium heat until it thickens, then let it cool before adding it to an art surface.
Use the gypsum recipe when you want a multi-ingredient blend. Combine 1 part cold water, 1 part wood glue, 3 parts gypsum, and 1 part white acrylic paint. For a thinner gypsum mixture, use 2 parts wood glue, 2 parts gypsum or calcium sulfate, and 1 part white acrylic paint. Measure each ingredient in the same unit to preserve the stated proportions.
Try powdered marble for a different material balance. Mix 1 part acrylic medium or acrylic binder with 2 parts powdered marble or calcium carbonate. The larger share of powder creates a different blend from equal-part glue recipes. Stir gradually, checking whether the paste spreads smoothly before applying it to your artwork.
Make a joint-compound mixture in a small batch. One recipe lists 6 tablespoons of Gorilla wood glue and 9 tablespoons of DAP plaster of Paris. Treat the named amounts as recipe-specific, rather than substituting them into an equal-parts formula. Add ingredients carefully and mix until the texture is even.
Adjust consistency and store only what you need. If a joint-compound paste is loose, add no more than 1/2 tablespoon of Plaster of Paris at a time. Homemade paste doesn’t last as long as store-bought paste, so mix a small batch. It can be stored in an airtight container wrapped in plastic wrap for 48 hours.
Ready to explore texture-making with guidance? Explore guided texture-art practice and shape your next project through hands-on experimentation.
Art Therapy: Resin Art Workshop
Art Therapy offers a Resin Art Workshop for readers ready to explore another hands-on material after practising texture paste. If you’re drawn to layered surfaces but want to experiment with resin, this workshop offers a creative next step. For more practice with raised forms, choose the 3D Texture Art Workshop; for brushwork and colour, consider Acrylic Painting Workshop or Oil Painting Workshop.
Each approach offers a different way to create, from shaping a surface to building colour with deliberate strokes. Choose one based on the material or process you want to explore, without needing to turn every experiment into a finished masterpiece.
Contact Art Therapy to find a workshop that fits your creative interests.
Let your next artwork take shape
As you continue learning how to use texture paste in art, give yourself room to develop an idea beyond the first mark. A small experiment can become the start of a personal visual language, shaped by the patterns, colours, and surfaces you enjoy. If you are looking for visual inspiration from original fine art, visiting online collections like gartsy.com can offer fresh perspectives on composition and style. You don’t need to know the finished result before you begin.
If you’d like to explore that process with guided, hands-on making, Art Therapy offers a 3D Texture Art Workshop, alongside Resin Art, Acrylic Painting, and Oil Painting Workshops. Each offers a different material and direction for creative exploration, whether you want to build dimension or spend time with colour and form.
Take the next step at your own pace. Contact Art Therapy to explore textured art and find a creative direction that feels right for you.
Frequently Asked Questions
What is Textured Art?
Textured art uses visible or tactile changes to a surface to add depth, movement, or emphasis. A painted piece might pair a raised focal area with flatter surroundings, drawing attention to the contrast between light and shadow. Texture can also come from layered materials or repeated marks. It isn’t limited to abstract work: a textured border can frame lettering, while a single raised shape can anchor a simple composition.
How do you apply texture paste to a canvas step by step?
To apply paste to canvas, decide where you want the raised areas and keep the canvas stable while you work. Test your marks on a spare surface so you can adjust the design first. Spread paste with a tool that suits the shape, leaving clear space around important details. Once it has dried fully, add colour selectively; a small brush can reach narrow grooves without flattening their edges.
What tools can you use to apply and shape texture paste?
A palette knife or spatula spreads paste, while a butter knife or paint scraper moves thicker mixtures. Drag a comb through wet paste to create parallel grooves or waves. For smaller marks, try a brush or sponge: stippling creates dots and layered effects. Choose a tool for the mark you want, not for how many tools you own. Wash acrylic modelling paste from tools with water before it dries.
How long does texture paste take to dry and cure?
Texture paste dries at a speed similar to acrylic paint, but the layer’s thickness affects how long it takes. Let it air-dry, and wait at least 24 hours before painting the textured surface. Check thicker areas carefully because the centre can remain damp after the outer surface feels dry. “Cure” is sometimes used loosely in craft instructions; for painting, the practical sign is that the paste has dried completely.
Can you mix acrylic paint or pigments into texture paste?
Yes, you can mix acrylic paint with modelling paste to create a thicker paint for impasto work. Add the paint gradually and stir until the colour is even, then test a small mark to see how the mixture spreads. Acrylic paint, sand, or fabric can each change the visual result. Dry pigments differ from liquid acrylic paint, so don’t assume they’ll behave the same way in every homemade recipe.
How do you seal or paint over dried texture paste?
Once the paste is completely dry, paint over it with acrylic or oil paint, or leave it unpainted for a raw surface. For subtle dimension, dry-brush a small amount of colour over the raised areas. Glazing adds a translucent layer while keeping the texture visible. A protective varnish can seal textured canvas artwork; apply it only after the painted layers have dried, following the varnish directions.
Is texture paste suitable for paper, wood, and other surfaces?
Homemade texture paste can be used on wood, cardboard, signs, canvas, and thrifted decor. A wooden painting board or Masonite panel provides firm support; a double-thick canvas is recommended for heavier texture. Paper can be delicate under wet, heavy material, so try a thin application on sturdy paper first. Testing shows how the surface responds before you build a larger design.



Comments